NTFS File Copy Utility (ntfscopy)
Introduction
ntfscopy is a prototype tool that can copy any file (or alternate data stream) from a NTFS file system. This can be from either a live system or from an imaged NTFS volume or drive. The term copy as it is used here, means it can be done in one of two modes: (a) 'raw' or (b) 'normal', where the latter is the default.
In 'raw' mode, ntfscopy will copy all the data clusters allocated to the file in question. Consequently, this allows one to view the file contents as they were stored on the physical disk, including any slack space and any compression used.
The default mode is to copy only the clusters or portions of clusters used to store valid data. So in this mode, no slack space will be copied. In addition, if the NTFS file incorporates the standard Windows disk compression, the default mode will try to uncompress the data and copy the data as it would be viewed if opening the file normally. The compression here is assumed to only be the native NTFS file compression as opposed to a third party compression scheme.
ntfscopy is able to copy any file on the file system since it accesses the hard drive at the cluster level. In its current form, it does not rely on any unique drivers but handles the cluster to NTFS translation in the usermode space using its own parsing engine. What this means, it is does not make use of any Windows NTFS unique API calls. This allows ntfscopy to bypass the read permissions of the file and read any file with just administrative privileges. This includes files locked down by the operating system such as registry hives and other files open for exclusive access. The administrative privileges are needed only so ntfscopy can perform cluster reads. Using this approach, one maximizes the chances that the data that is being copied is not being transformed by some mechanism in-between your request to copy and the actual copy. This becomes more of an issue if there is some malware or root-kit on the box you are investigating.
ntfscopy has been compiled to run on Windows, Linux or Mac OS-X. From the Windows perspective, it should work on Windows XP up to Windows 8 beta.
How to Use ntfscopy
ntfscopy requires administrative privileges to copy from a live Windows system to obtain read access to the clusters on the drive; otherwise it will be restricted to copying files from off-line images. Therefore to perform live processing of volumes, one needs to launch the command prompt with administrator privileges.
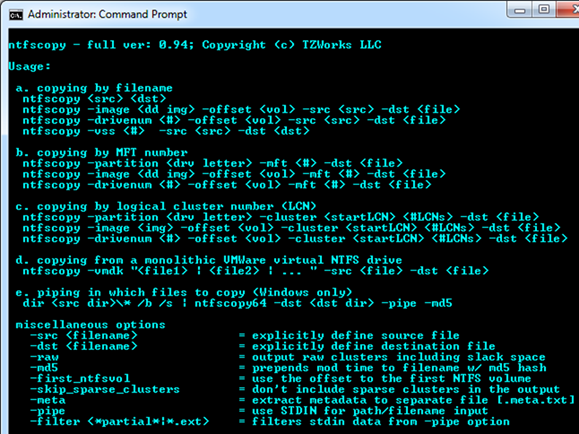
One can display the menu options by typing in the executable name with no parameters. A screen shot of the menu is shown below. From the available options, one can copy files using a number of options: (a) from a live NTFS volume, (b) from a captured image with an NTFS partition, (c) from a VMWare volume.
After selecting a source medium to copy from, one selects the target file. This could include: (a) a path/filename, (b) the MFT entry of the file, or (c) the 'cluster run' one is interested in extracting. There are also optional parameters, so one can select various switches to cause the copy to behave in different ways.
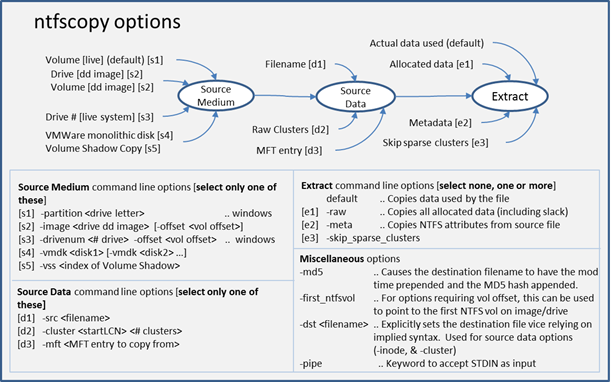
The figure below shows the possible choices and where they apply in a logical processing flow. The comments in the figure annotate any restrictions for a particular option.
Copying a File from a Live Volume
To copy a file from a live NTFS volume (or partition), one has two choices: (a) specify the absolute path of the source file, or (b) specify the drive number and volume offset by using the –drivenum <num> –offset <volume offset> option. Either choice accomplishes the same task. The first choice is more straightforward and easier to use. The second choice is more complex, but allows one to target hidden NTFS partitions that do not have a drive letter. A couple examples are shown below:
    ntfscopy c:\$boot c:\dump\vol_boot.bin
    ntfscopy –drivenum 0 –offset 0x100000 –src \$boot –dst c:\dump\vol_boot.bin
    ntfscopy –drivenum 0 –first_ntfsvol src \$boot –dst c:\dump\vol_boot.bin
The first example targets the hidden $boot file in the 'c' partition and copies the contents to the c:\dump\vol_boot.bin file. The second example copies the $boot file from the volume that starts at offset 0x10000 hex relative to drive 0. In this case, offset of 0x100000 is the first NTFS partition on my drive 0. It also happens to be a hidden partition. Included in the syntax is the –src <file> and –dst <file> to explicitly define the source and destination files. The third example yields the same result as the second, but allows one to target the first NTFS partition without specifying any offsets via the first_ntfsvol option. This is useful when scripting ntfscopy to pull files from any box without worrying what is the offset of the first NTFS volume is.
Another example of pulling data from a live volume is to use the –cluster <starting Logical Cluster Number> <# clusters> option. Geared more for the reverser, this allows one to pull any cluster run from a volume. An example is shown below:
ntfscopy –partition c –cluster 0 4 –dst c:\dump\cluster_dump.bin
The above example pulls the first 4 clusters from the 'c' partition. Instead of using the source medium of –partition <drive letter>, one could have specified it to be –drivenum <num> –offset <vol offset> as was used in the examples earlier.
Copying a File from an off-line Image
To process an image that has been already acquired and is in the 'dd' format, one uses the –image switch. This option can be used in two flavors. If the image is of an entire drive then one needs to explicitly specify the offset of the location of the volume you wish to target. On the other hand, if the image is only of a volume, then you do not need to specify the offset of the volume (since it is presumed to be at offset 0).
For the first case, where an offset needs to be explicitly specified, ntfscopy will help the user in locating where the NTFS volume offsets are. If one just issues the –image command without the offset, and there is not a NTFS volume at offset 0 (eg. second case mentioned above), ntfscopy will proceed to look at the master boot record contained in the image, determine where the NTFS partitions are, and report them to the user. This behavior was meant to be an aid to the user so that one does not need to resort to other tools to determine where the offsets for the NTFS volumes are in an image. Below is a screenshot what is displayed to the user in this situation.
Shown in the screenshot is a –image command that is issued without the offset. ntfscopy detects that the image is of an entire drive versus of a volume and locates one NTFS volume at offset 0x159000 hex. ntfscopy then reports to the user a suggested syntax (of the command, if re-issued) to process this volume.

Another nuance with using images as the source is when specifying a path to a directory within the image to analyze. Since the image is not mounted as a drive, one really should not associate it with a drive letter when specifying the path. If one does do this, ntfscopy will ignore the drive letter and proceed to try to find the path starting at the root directory which is at MFT entry 5 for NTFS volumes.
In the below example, we copy the $MFT record to a temporary directory to analyze it with some other tools.
ntfscopy –image c:\dump\my_image.dd –first_ntfsvol –src \$MFT –dst c:\dump\vol_mft.bin
The –src and –dst keywords are used to identify the source and destination files. Note that the source does not have a drive letter, but the destination does. Finally, since we want to target the first NTFS volume, we use the shortcut switch of –first_ntfsvol. One could have specified the offset of the NTFS volume using the –offset option, as well.
Copying a File from a VMWare Volume
This option is still considered experimental since it has only been tested on a handful of configurations. Furthermore, this option is limited to monolithic type VMWare images versus split images. In VMWare, the term split image means the volume is separated into multiple files, while the term monolithic virtual disk is defined to be a virtual disk where everything is kept in one file. There may be more than one VMDK file in a monolithic architecture, where each monolithic VMDK file would represent a separate snapshot.
When working with virtual machines, the capability to handle snapshot images is important. Thus, if processing a VMWare snapshot, one needs to include the desired snapshot/image as well as its inheritance chain.
ntfscopy can handle multiple VMDK files to accommodate a snapshot and its descendants, by separating multiple filenames with a pipe delimiter and enclosing the expression in double quotes. In this case, each filename represents a segment in the inheritance chain of VMDK files (eg. -vmdk "<VMWare NTFS virtual disk-1> | .. | <VMWare NTFS virtual disk-x>" ). To aid the user in figuring out exactly the chain of descendant images, ntfscopy can take any VMDK file (presumably the VMDK of the snapshot one wishes to analyze) and determine what the descendant chain is. Finally, ntfscopy will suggest a chain to use.
Aside from the VMDK inheritance chain, everything else is the same when using this option to that of normal 'dd' type images discussed in the previous section.
Including Slack space in the Copy
Each file that reserves allocated space will most likely not use all the allocated space. This allocated, but unused space is call slack space. The contents of the slack space may contain some data from the previous owner of the cluster.
The default behavior of ntfscopy is to only copy the valid (or used) space of the file and discard any slack space. One can change this default behavior by invoking the –raw switch to copy all the allocated space associated with a file. This will thus include all the unused space (or slack space) in the resulting file.
Another fine point with the default behavior is that any file that is stored using the native NTFS compression attribute will be uncompressed during the copy operation. However, with the –raw option, the copy operation will include a bit for bit copy of the allocated clusters. This means if the file is using the native NTFS compression, then the copied file will contain that structure as well.
Piping in Filenames to Copy
While copying one file at a time is useful, one may want to copy all the files in a directory or a set of subdirectories. One way to do this is to pipe in all the paths/filenames of the files one wishes to copy into ntfscopy. To allow ntfscopy to receive data from an input pipe, one needs to invoke the –pipe switch. This will put ntfscopy into a mode to receive a separate path/filename per line as input. To provide this input, one can use the Windows built-in dir command along with some of its internal switches to get the desired result. Below is an example of a way to copy all the user hives from a live system into a separate directory:
dir c:\users\*ntuser.dat /b /s | ntfscopy –pipe –dst c:\dump\hives –md5
The command above makes use of the operating system's dir shell command. By specifying the c:\users\*ntuser.dat as the criteria to start and filter during the search, the dir command will only return those files that contain the 'ntuser.dat' character sequence. Using the switches /b and /s, the dir command will traverse all the subdirectories starting with the c:\users\ directory and return an absolute path to the files found without any extraneous information. The output returned from dir is 'piped' into the ntfscopy application, which uses the –pipe switch, –dst switch and the –md5 switch. The –pipe switch tells ntfscopy to expect input from standard input. The –dst switch in combination with the –pipe switch says to put all the files copied into the directory specified by –dst, which in this case is c:\dump\hives. Finally, to ensure each ntuser.dat file copied has unique name, to avoid being overwritten by another same named one, the –md5 switch is used to append the md5 hash to the copied file.
One does not need to use the dir shell command, but could use a listing of filenames with their absolute paths and just print out the list to the console while piping it into ntfscopy as shown above to achieve a similar result of copying many files in an automated fashion.
Ignoring Sparse Clusters
Windows uses the concept of sparse clusters for reserving a size for a file without actually using clusters. Normally when copying a file, one could care less about the sparse clusters. This is because sparse data is not backed by real clusters, and thus the sparse data is realized as just zeros.
ntfscopy allows one to skip these types of clusters via the –skip_sparse_clusters switch. This option is important since blindly copying a file, that has many sparse clusters, may be much more data than you expected. A useful file in forensics that contains sparse data is the change log journal. The size of the change log journal can be significantly smaller when using this option. See the discussion on Alternate Data Streams for an example of using this option.
Copying the NTFS Attributes
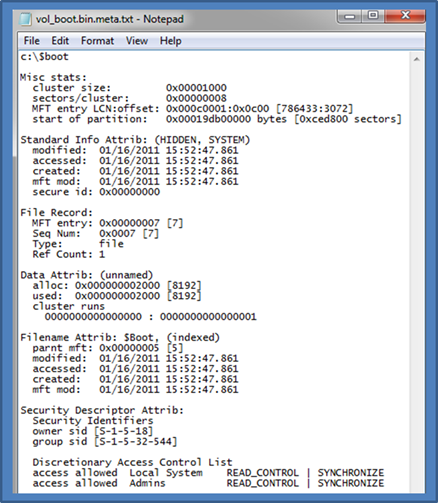
If one wishes to copy the NTFS attributes associated with a file during the copy operation, one can invoke the –meta switch. This option tells ntfscopy to copy both the metadata and normal data associated with the file. Two files will be generated during this operation: (a) the normal copied file and (b) a separate file containing all the NTFS metadata. The name of the metadata file will be the same as the normal data file with the additional characters ".meta.txt" as a suffix. Below is an example that is taken from one of the sections above but with the –meta switch added:
ntfscopy c:\$boot c:\dump\vol_boot.bin –meta
The above results in 2 files: (a) vol_boot.bin, which contains the contents of $boot and (b) the metadata file vol_boot.bin.meta.txt. Below is snapshot of the contents one should expect from the metadata file.
Copying Alternate Data Streams (ADS)
In NTFS, each file consists of one or more data streams. Most files, however, contain one data stream and it is an 'unnamed stream' which the operating system uses as the default (or primary) stream. Additional data streams, if present, will be 'named' and are called Alternate Data Streams (ADS). These alternate streams provide a way for Windows to store additional data (metadata, security settings, or just a blob of data) within one file and allow each of the data entities to be completely separate from the primary data or other ADS's. The ADS separation between each other includes not only a unique name, but also separate cluster runs to store its data if it is too large to fit within the NTFS attribute for the alternate stream.
The notation to address an alternate stream is to use the colon character as follows: <filename>:<ADS>. Alternate streams are not displayed in Windows Explorer, and their size is not included in the file size that is reported to the user.
As an example, below is an important file in computer forensics, the NTFS change log journal. As background, the change log journal resides in the [root]\$Extend\$UsnJrnl file in the $J alternate data stream. On in Windows 7, the UsnJrnl collection is on by default for the primary partition, logging the all MFT entry changes on that volume.
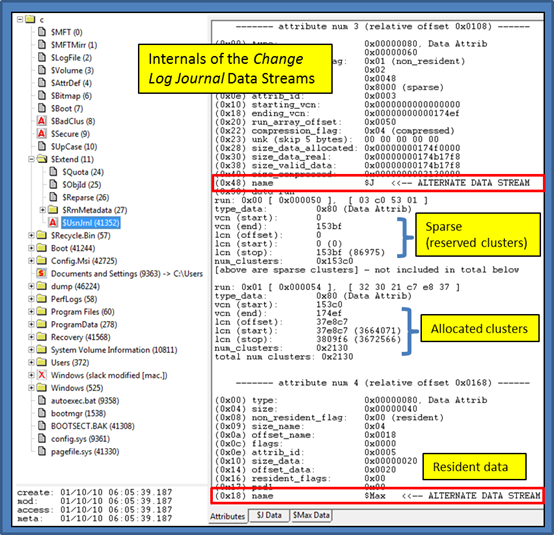
Using our custom-built NTFS viewer, we took a snapshot of the UsnJrnl file. Highlighted are two named data streams: (a) the $J stream and (b) the $Max stream. The $J stream includes a combination of sparse space (reserved but not allocated) and allocated cluster data. The $Max stream contains all its data within the NTFS attribute and therefore is called resident data. Either of the data associated with these named streams can be copied by ntfscopy. Below are some examples:
    ntfscopy c:\$Extend\$UsnJrnl:$J c:\dump\usnjrnl.bin
    ntfscopy c:\$Extend\$UsnJrnl:$J c:\dump\usnjrnl.bin –skip_sparse_clusters
    ntfscopy c:\$Extend\$UsnJrnl:$Max c:\dump\usnjrnl.max.bin
The first and second examples copy the $UsnJrnl:$J data stream, however the second skips the sparse clusters and only copies the clusters that are allocated. ntfscopy handles sparse clusters as if they are clusters with zero content, therefore, the first example will substitute zeros in for each sparse cluster copied and the resulting file will be much larger, to the tune of approximately 0x153c0 hex clusters bigger, than the second without providing any additional value.
The third example shows one can target any stream within the file and copies out the $UsnJrnl:$Max resident data from the data attribute.
For more information
The user's guide can be viewed here
If you would like more information about ntfscopy, contact us via email.
Downloads
| Intel 32-bit Version | Intel 64-bit Version | ARM 64-bit Version | ||||
| Windows: | ntfscopy32.v.1.14.win.zip | ntfscopy64.v.1.14.win.zip | ntfscopy64a.v.1.14.win.zip | md5/sha1 | ||
| Linux: | ntfscopy32.v.1.14.lin.tar.gz | ntfscopy64.v.1.14.lin.tar.gz | ntfscopy64a.v.1.14.lin.tar.gz | md5/sha1 | ||
| Mac OS X: | Not Available | ntfscopy.v.1.14.dmg | ntfscopy.v.1.14.dmg | md5/sha1 | ||
| *32bit apps can run in a 64bit linux distribution if "ia32-libs" (and dependencies) are present. | ||||||